
This is one of two recipes I have memorized. When Rob and I got married, my sister had everyone included in our wedding party design a quilt square for us. One of our host and hostess (my 2nd parents at the time) put the recipe for Taco Casserole on their square because I called her at least once a month to request it. Then, after we were married, I'd run down the stairs at least once a month to read the recipe off our guest bedroom quilt. I'm happy to report, I have finally memorized it.
Anyway, onto the recipe. For what it's worth, I'm not a big taco fan, yet this remains one of my favorites.
Taco Casserole
1 lb ground beef
3/4 c water
1 packet taco seasoning
1 can refried beans
2 cups shredded cheese (I find regular works better than "finely" shredded)
1 cup sour cream
1 egg
1 pk crescent rolls
Preheat oven to 350. In a 9x13 pan, unroll the crescent rolls and press them onto the bottom of a 9x13 pan. Bake this for 7 minutes then set aside. Meanwhile, brown the hamburger in a skillet. When browned, add the water and the taco seasoning. Mix in the refried beans and remove from heat. In a seperate bowl, mix together the cheese, egg, and sour cream. Now, pour the meat mixture onto the semi-baked crescent rolls, spread it out. Put the cheese mixture on top of the meat mixture and spread to the best of your ability (never seems like enough to cover it...but it works). Bake this for 20 minutes. Let it cool for about 10 minutes before serving. We usually dribble a little taco sauce on our pieces.
Finding a side dish to go with this is difficult. We have settled on either Fritos (yes, that counts as a side dish in our house) or corn.
Also, I split a regular recipe into two seperate square 8 or 9 inch pans. Just divide everything in half and make two seperate pans at the same time. Before the final baking wrap one in cling wrap, then aluminum foil, then seal it in a gallon size bag and put it in the freezer. I thaw it out the night before I'm going to cook it for dinner and just cook it the same as the other (350 for 20 minutes). One night of work, two nights of dinner!
Showing posts with label main dish. Show all posts
Showing posts with label main dish. Show all posts
Tuesday, January 12, 2010

Friday, January 1, 2010
Sausage and Peppers over Pasta
I'm not even going to attempt to post a picture of this dish because most pictures of food I take give me the exact opposite reaction than they should. But, trust me, this is delicious. It has now become my favorite meal. Since Tuesday was my birthday, I requested our in-house chef make this for me. I don't know where he found the recipe. Maybe he didn't find it, maybe he created it out of thin air, he's been known to do such things. What I do know is that this is absolutely delicious, and absolutely not fat free. Try it today! Or, shop for the ingredients today, and try it tomorrow. It's probably not stuff you have lying around.
I strongly encourage you to read this recipe through before you make it, as I am kind of a random recipe writer and probably have things out of order. As for measurements, well, our personal chef is more of a "visual" guy so these are his best estimates.
1 lb mild Italian sausage
1/4 c onion (whatever your favorite kind is)
1 yellow pepper, cut into strips
1 red pepper, cut into strips
1 can diced tomatoes (of course fresh is always better, but a can will do)
1 pint Heavy Whipping Cream
2 cloves minced garlic (we like garlic...maybe this is too much for some)
salt and pepper to taste
In one large pot, brown the italian sausage with some salt and pepper. When completely browned, remove from pot. In a seperate skillet, start heating some olive oil and garlic. Add onions to this skillet and sautee until the onions are translucent. Add the can of diced tomatoes (juice and all) and heat this all together. Meanwhile, in the large pot, start heating a bit of olive oil and throw in the peppers. We do these seperately because we like our peppers a little crisp yet browned and if we added them with the rest of the stuff, they would not get browned and might be overcooked. Add the heavy whipping cream to the tomatoes mixture and heat through. Throw the sausage back in with the peppers (in the big pot) and add the tomatoe mixture to the sausage and pepper mixture. Mix this all up and serve it over your choice of noodles. We like whole wheat thin spaghetti. We also like to serve this up with garlic bread.
Yum!
I strongly encourage you to read this recipe through before you make it, as I am kind of a random recipe writer and probably have things out of order. As for measurements, well, our personal chef is more of a "visual" guy so these are his best estimates.
1 lb mild Italian sausage
1/4 c onion (whatever your favorite kind is)
1 yellow pepper, cut into strips
1 red pepper, cut into strips
1 can diced tomatoes (of course fresh is always better, but a can will do)
1 pint Heavy Whipping Cream
2 cloves minced garlic (we like garlic...maybe this is too much for some)
salt and pepper to taste
In one large pot, brown the italian sausage with some salt and pepper. When completely browned, remove from pot. In a seperate skillet, start heating some olive oil and garlic. Add onions to this skillet and sautee until the onions are translucent. Add the can of diced tomatoes (juice and all) and heat this all together. Meanwhile, in the large pot, start heating a bit of olive oil and throw in the peppers. We do these seperately because we like our peppers a little crisp yet browned and if we added them with the rest of the stuff, they would not get browned and might be overcooked. Add the heavy whipping cream to the tomatoes mixture and heat through. Throw the sausage back in with the peppers (in the big pot) and add the tomatoe mixture to the sausage and pepper mixture. Mix this all up and serve it over your choice of noodles. We like whole wheat thin spaghetti. We also like to serve this up with garlic bread.
Yum!
Monday, November 16, 2009
Peppered Steak

This is a recipe that Rob brought to the marriage. We make it all the time. Especially when our garden is spitting out all those peppers and tomatoes. Also, because I was getting free stew meat from Target about 6 months ago and I have enough, in the freezer, to last us a lifetime.
Ingredients
1 lb stew meat
1/4 c worchestershire sauce
1/2 c beef broth
1 tbsp minced garlic
1 green pepper, sliced into 1 inch pieces
1 tomato, sliced into pieces
1 tsp cornstarch
2 tbsp water
salt, pepper
Brown the meat in a large skillet with the garlic, salt, and pepper. Once the meat is browned, add the worchestershire and beef broth. Once that reaches a boil, pour everything into a crockpot set on low. I usually start this around 1pm and we eat at 6pm....do what works for you.
Right before dinner, transfer the goodness back into the skillet. Add the pepper. Bring to a boil . Mix the cornstarch and water and pour it, while stiring, into the meat mixture. Continue this process until the sauce reaches your desired thickness. Add the tomato last. I don't like mushy tomatoes, so I add them just before serving making sure they have just enough time to heat through
We serve this over brown rice. It's really great with some garlic bread too....but that's a luxury around here and only appears with this meal when I'm really on the ball.
Wednesday, November 4, 2009
Chipotle's Carnitas
A couple people have asked me for the recipe for the Carnitas we made for the Fiesta this past summer. I posted it in the comments section there, but we have been making these pretty routinely around our house, so I thought I'd post the recipe here as well.
The Carnitas end up tasting very similar to Chipotle's carnitas, and if we ever figure out how to successfully duplicate their rice, you'll be the first to know.
Here's what you need:
•One 7lb pork butt, cut into 10 large chunks
•1 very large onion, quartered
•5 chipotle chiles in adobo, seeded & chopped, plus 3 tablespoons adobo sauce from the can
•1 tablespoon ground cumin
•1 tablespoon ground coriander
•1 tablespoon dried oregano
•1 tablespoon salt
•2 bay leaves
•2 to 3 quarts low sodium chicken broth
•2 tablespoons vegetable oil
Just so you know, it's almost impossible to find a 7 lb pork butt. Also, it's embarrassing to yell the words "Pork Butt" to the local butcher across a crowded meat section. Take it from me.
Okay, moving on. You will most likely end up with a 5 pounder at most so just adjust the ingredients accordingly.


It's nice that you don't have to cut the onions much, just big chunks. You know what my super power is? Cutting onions....they don't bother me at all.
From here, you just add the rest of the ingredients right into the pot, except for the oil...save that for later. A note on the chiles, they can be found in the authentic Mexican food section of your grocery store, not the "Ortega Taco Mix" Mexican section. Take it from Rob.
A little 7.5 oz can will give you plenty of chiles.
Then just pour in enough chicken broth to cover everything up (I don't measure that part, but one super large can was enough for this one). Stir it up, cover it, and bring it to a boil. Once it's boiling, uncover it and let it simmer for 3 hours.

After only a half hour, your house will smell delicious.
After 3 hours you'll be drooling, but take this moment to heat your oven up to 450. Drizzle some olive oil (or vegetable oil) on a shallow pan. Use a slotted spoon to take out the large meat chunks and place them on the pan. With a fork, you can pull apart the meat into smaller, more manageable pieces.

The Carnitas end up tasting very similar to Chipotle's carnitas, and if we ever figure out how to successfully duplicate their rice, you'll be the first to know.
Here's what you need:
•One 7lb pork butt, cut into 10 large chunks
•1 very large onion, quartered
•5 chipotle chiles in adobo, seeded & chopped, plus 3 tablespoons adobo sauce from the can
•1 tablespoon ground cumin
•1 tablespoon ground coriander
•1 tablespoon dried oregano
•1 tablespoon salt
•2 bay leaves
•2 to 3 quarts low sodium chicken broth
•2 tablespoons vegetable oil
Just so you know, it's almost impossible to find a 7 lb pork butt. Also, it's embarrassing to yell the words "Pork Butt" to the local butcher across a crowded meat section. Take it from me.
Okay, moving on. You will most likely end up with a 5 pounder at most so just adjust the ingredients accordingly.

Rob usually makes this. I spent 7 years in a food safety lab do far worse things to raw meat than just cutting it up, but still, if I can avoid it, I do.
Add the onions.

It's nice that you don't have to cut the onions much, just big chunks. You know what my super power is? Cutting onions....they don't bother me at all.
From here, you just add the rest of the ingredients right into the pot, except for the oil...save that for later. A note on the chiles, they can be found in the authentic Mexican food section of your grocery store, not the "Ortega Taco Mix" Mexican section. Take it from Rob.
A little 7.5 oz can will give you plenty of chiles.
Then just pour in enough chicken broth to cover everything up (I don't measure that part, but one super large can was enough for this one). Stir it up, cover it, and bring it to a boil. Once it's boiling, uncover it and let it simmer for 3 hours.

After 3 hours you'll be drooling, but take this moment to heat your oven up to 450. Drizzle some olive oil (or vegetable oil) on a shallow pan. Use a slotted spoon to take out the large meat chunks and place them on the pan. With a fork, you can pull apart the meat into smaller, more manageable pieces.

Pop that baby in the oven for 20-30 minutes until it's nicely browned. The picture above is pre-oven. Just picture it slightly darker and you have post-oven.
We serve ours with a semi-tasty version of Chipotle's Lime Rice plus cheese, lettuce, tomatoes, and sour cream. Whatever you happen to like. Rob makes his into tacos or burritos. I prefer the burrito bowl style.
Tuesday, October 27, 2009
Rice Meatballs
I made it last night. It's easy, and it is one of the only meals that every single child eats. And EATS! This was a favorite of mine growing up (and still is) and it's not rare for Austin to match me meatball for meatball.
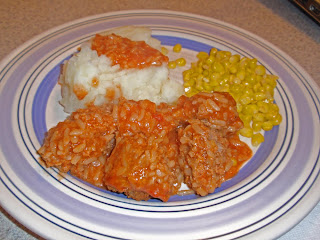
1 can tomato soup
1 can water
1 egg
1 c rice (if you use instant rice, I find 3/4 cup is plenty)
salt, pepper, garlic salt
Mix ground beef, egg, rice, and seasoning together (use your hands...gross but effective). In a seperate bowl mix together tomato soup and water. Form about 1.5 inch balls out of the meat mixture and plop them into the tomato soup mixture. Bake at 350 for one hour, stirring half way through.
The next day, cut leftover meatballs in half, lay them on a hoagie bun, layer that with a bit of cheese (provolone, white american, etc.) throw them in the toaster oven to heat them up and for a whole new meal!

We always pair it with "smashed" potatoes and corn. The recipe is a bit versatile too. If you want to, substitute brown rice for the white rice. Or, ground turkey instead of ground beef...whatever floats your boat. Another reason I like this is becuase I can make it the night before or during naptime and just let it hang out in the fridge until "go time".
Rice Meatballs
1 lb ground beef1 can tomato soup
1 can water
1 egg
1 c rice (if you use instant rice, I find 3/4 cup is plenty)
salt, pepper, garlic salt
Mix ground beef, egg, rice, and seasoning together (use your hands...gross but effective). In a seperate bowl mix together tomato soup and water. Form about 1.5 inch balls out of the meat mixture and plop them into the tomato soup mixture. Bake at 350 for one hour, stirring half way through.
The next day, cut leftover meatballs in half, lay them on a hoagie bun, layer that with a bit of cheese (provolone, white american, etc.) throw them in the toaster oven to heat them up and for a whole new meal!
Monday, October 19, 2009
BBQ Ranch Chicken Salad
This is a quick meal. Really quick. Most of the ingredients we usually have on hand. Plus, it's versatile so even if you don't have the required ingredients on hand, you can improvise.
We stole this recipe from the Cheesecake Factory. I mean, we don't actually know their recipe, but we made ours based on theirs. And I'm guessing our final recipe is about a 1/4 of their recipe since most of their dishes designed for a single person could easily feed 2-3 people.
Anyway, onto the recipe. Here is what the Cheesecake Factory's looks like:


We stole this recipe from the Cheesecake Factory. I mean, we don't actually know their recipe, but we made ours based on theirs. And I'm guessing our final recipe is about a 1/4 of their recipe since most of their dishes designed for a single person could easily feed 2-3 people.
Anyway, onto the recipe. Here is what the Cheesecake Factory's looks like:

And then here's what you can more realistically expect your salad to look like:

I realize that second salad does not look appetizing at all, but, trust me, it is. I also have no dreams of being a great food photographer, so I will never learn how to make my food look scrumptous.
Anyway - onto the recipe.
Chicken
Lettuce (spinach, romaine, iceburg, whatever you have on hand)
Can of black beans (rinsed)
Can of corn (or bag of frozen cooked first)
Cucumbers
Tomatoes
Ranch Dressing
BBQ Sauce
You can make your chicken however you prefer, or you could even just use those pre-cooked seasoned strips you can find by the deli meat. We like our chicken just a little bit crispy on the outside though, so I heat up some olive oil, toss in a tiny bit of butter. While that is getting nice and hot, I season (salt, pepper, garlic salt) the chicken, then I sprinkle a bit of flour on each side. I'm not going for the "fried" chicken effect, so it's not much flour....just enough for a tiny bit of crispiness. Cook both sides of the chicken until they are a nice golden brown.
And from here, it's really up to you and your pantry. Tonight, we didn't have a cucumber on hand, and I wasn't feeling like tomatoes. Our spinach, which we normally use (added health benefits), was looking a little sad so I went with traditional iceburg, but would have preferred romaine.
Black beans aren't normally on my list of foods I seek out, but they really add something in this salad.
Mix the ranch dressing and BBQ sauce together in a 2:1 ratio (respectively) and enjoy!
Tuesday, September 29, 2009
White Chicken Chili
I'll let you in on a secret. I don't like cooking.
Well, that's not completely true. If I had the time to cook a nice meal, without Austin, Ellie, and Riley's "help", I'd enjoy it a bit. But, since the kids aren't going anywhere anytime soon, I don't look forward to making dinner. Therefore, my cooking style is quick, easy, and yummy. I lean towards healthy choices, but I also don't let a little extra fat or salt stop me from making a dish.
Enter: White Chicken Chili

It's fast, it's fairly "hands off", and it's probably loaded with salt. I don't know that for sure, because I haven't read the back of the package, but most mixes are. But, aside from the salt content, it's a fairly healthy dish.
I doctor it up a bit, so here's my recipe:
~1 lb of cubed chicken breast
1 tsp olive oil
salt, pepper, garlic salt
1 pk of McCormick's White chicken chili ($0.88 at walmart)
1 can northern beans (not drained)
1 c water
1 can diced tomatoes (drained)
1 can diced tomatoes with green chilies (drained)
Heat the oil in a large wok/skillet. Add chicken, season it, and cook through. Once the chicken is cooked, add the beans, water, seasoning packet, and tomatoes. Mix well and simmer for 20 minutes. The directions recommend covered but I've done both and don't taste a difference.
I serve it up with a mound of shredded cheese on top. Everything is better with cheese. The chili has a bit of a Santa Fe taste to it. If you're worried about the spicy-ness of the dish, then I recommend omitting that can of tomatoes with green chilis. On occasion, I've also thrown some frozen corn into the mix.
It's one of the easiest recipes we make around here. Surprisingly, each one of the kids eats it. Even Ellie, who refuses Kraft Mac and Cheese on occasion. She's our toughest critic these days and last night she said "Mmmmm....yummy mommy! I yike it!"
Well, that's not completely true. If I had the time to cook a nice meal, without Austin, Ellie, and Riley's "help", I'd enjoy it a bit. But, since the kids aren't going anywhere anytime soon, I don't look forward to making dinner. Therefore, my cooking style is quick, easy, and yummy. I lean towards healthy choices, but I also don't let a little extra fat or salt stop me from making a dish.
Enter: White Chicken Chili

It's fast, it's fairly "hands off", and it's probably loaded with salt. I don't know that for sure, because I haven't read the back of the package, but most mixes are. But, aside from the salt content, it's a fairly healthy dish.
I doctor it up a bit, so here's my recipe:
~1 lb of cubed chicken breast
1 tsp olive oil
salt, pepper, garlic salt
1 pk of McCormick's White chicken chili ($0.88 at walmart)
1 can northern beans (not drained)
1 c water
1 can diced tomatoes (drained)
1 can diced tomatoes with green chilies (drained)
Heat the oil in a large wok/skillet. Add chicken, season it, and cook through. Once the chicken is cooked, add the beans, water, seasoning packet, and tomatoes. Mix well and simmer for 20 minutes. The directions recommend covered but I've done both and don't taste a difference.
I serve it up with a mound of shredded cheese on top. Everything is better with cheese. The chili has a bit of a Santa Fe taste to it. If you're worried about the spicy-ness of the dish, then I recommend omitting that can of tomatoes with green chilis. On occasion, I've also thrown some frozen corn into the mix.
It's one of the easiest recipes we make around here. Surprisingly, each one of the kids eats it. Even Ellie, who refuses Kraft Mac and Cheese on occasion. She's our toughest critic these days and last night she said "Mmmmm....yummy mommy! I yike it!"
Subscribe to:
Posts (Atom)
